There’s just something about an ice cream cake that makes any day feel like a celebration. I first made this ice cream cake on a rainy weekend when my family and I needed a little pick-me-up. We didn’t want anything too complicated, just something rich, fun, and satisfying. This simple, layered cake turned into a family favorite instantly! It’s got the perfect balance of creamy ice cream, crunchy cookies, fudgy goodness, and light whipped cream. Plus, it’s so easy to customize with your favorite flavors, and you don’t even have to turn on the oven for most of it.
Now, whenever birthdays, summer parties, or cozy weekends roll around, this ice cream cake is our go-to treat. I know you’re going to love it too!
Why You’ll Love This Recipe
1. Simple Ingredients, Big Flavor:
With a handful of easy-to-find ingredients, you create a dessert that tastes like something from a fancy ice cream shop.
2. No-Bake Layers:
Aside from quickly prepping the cake base, there’s no need for baking. Most of the magic happens in the freezer.
3. Fully Customizable:
Pick your favorite ice cream flavors, swap out cookies, or go crazy with toppings—this cake fits whatever you’re craving.
4. Perfect for Celebrations:
Birthdays, graduations, or just a family movie night—this ice cream cake makes every occasion extra special.
5. Make Ahead Friendly:
Because it needs to freeze overnight, you can prepare it in advance, giving you one less thing to worry about on busy days.

Ingredients & Substitutions
Here’s everything you’ll need for your homemade ice cream cake:
Cake:
- 10 Oreo cookies (110g)
- 2 tablespoons (28g) unsalted butter, melted
- 1 1/2 quarts (1.42L) chocolate ice cream, softened (or other flavor)
- 1 cup (8 ounces/227g) hot fudge sauce, divided (homemade or store-bought)
- 1 1/2 quarts (1.42L) strawberry ice cream, softened (or other flavor)
Topping:
- 2 cups (480ml) heavy cream, cold
- 1/3 cup (40g) confectioners’ sugar
- 1 1/2 teaspoons pure vanilla extract
- Sprinkles, optional for garnish
Why These Ingredients?
Oreo Cookies:
They add the perfect crunch and classic chocolatey flavor. You use both the cookie and the cream filling, which makes the crust extra tasty.
Butter:
Helps hold the cookie crumbs together into a nice layer that adds texture to the cake.
Chocolate and Strawberry Ice Cream:
This classic duo is a fan favorite, but you can use any flavors you love.
Hot Fudge Sauce:
Adds rich, gooey layers that contrast beautifully with the cold ice cream.
Heavy Cream, Sugar, and Vanilla:
Homemade whipped cream is much lighter and fresher tasting than store-bought toppings.
Substitutions
- Different Cookies: Try chocolate chip cookies, graham crackers, or gluten-free cookies.
- Different Ice Creams: Use cookies and cream, peanut butter, mint chocolate chip, or anything that makes you happy.
- Store-bought Whipped Topping: If you’re short on time, a tub of whipped topping works in place of homemade whipped cream.
Step-by-Step Instructions
1. Make the Cookie Base:
In a food processor or blender, pulse Oreo cookies into coarse crumbs. Some small chunks are fine. Mix the crumbs with melted butter. Set aside.
2. Prepare the Pan:
Remove chocolate ice cream from the freezer and let it soften for about 10 minutes. Meanwhile, line a 9×3-inch or 10×3-inch springform pan with plastic wrap, making sure to leave plenty of overhang.
3. Build the First Layer:
Scoop the softened chocolate ice cream into the lined pan. Spread it evenly with the back of a large spoon. Freeze for 30 minutes.
4. Add Fudge and Cookies:
Warm your hot fudge sauce until spreadable but not hot. Spread 1/2 cup over the frozen chocolate ice cream. Sprinkle the Oreo crumb mixture evenly on top. Freeze again for 30 minutes.
5. Prepare the Second Ice Cream Layer:
About 20 minutes into freezing, set your strawberry ice cream out to soften for 10 minutes.
6. Build the Second Layer:
Drizzle the remaining 1/2 cup of hot fudge over the Oreo crumb layer. Quickly spoon the softened strawberry ice cream on top. Spread into an even layer.
7. Final Freeze:
Cover the cake tightly with plastic wrap or foil and freeze for at least 12 hours and up to 2 days.
8. Make the Whipped Cream:
Beat cold heavy cream, confectioners’ sugar, and vanilla extract with a handheld or stand mixer fitted with a whisk attachment on medium-high speed until stiff peaks form, about 4 minutes.
9. Assemble and Decorate:
Remove the springform pan rim. Carefully lift the cake using the plastic wrap and transfer it to a frozen cake plate or cutting board. Peel off the plastic wrap. Working quickly, spread whipped cream over the top and sides. Pipe a decorative border if desired and garnish with sprinkles.
10. Serve:
Slice with a sharp knife dipped in hot water for clean slices. Serve immediately, or freeze for up to 1 hour before serving if needed.
Note:
If you do not have a springform pan, you can assemble the cake in a 9×13-inch baking dish or an 8-inch square pan lined with parchment paper for easy removal.
If you love indulgent desserts, be sure to check out our Chocolate Ooey Gooey Cake for another rich and satisfying treat!
Additional Tips & Variations
Tips for Best Results:
- Softened, Not Melted Ice Cream: Let the ice cream sit out just long enough to become spreadable but still firm.
- Freeze in Stages: Freezing after each major step keeps the layers defined and prevents a melty mess.
- Chill Your Tools: Cold bowls and beaters help the whipped cream form faster.
Fun Variations:
- Different Flavors: Use peanut butter ice cream and chocolate chip cookie crumbs for a fun twist.
- Add Fruit: Layer in sliced strawberries, bananas, or raspberries for a refreshing touch.
- Crunchy Layers: Add chopped nuts, candy bars, or cereal between ice cream layers.
Storage:
Keep the cake tightly covered in the freezer. It’s best eaten within 5 days for optimal flavor and texture.
FAQs
Can I make this ice cream cake ahead of time?
Yes! It’s even better made a day ahead. You can keep it frozen for up to 2 days before serving.
What if I don’t have a springform pan?
Use a lined baking dish instead. Make sure to use parchment paper or plastic wrap for easy lifting.
Can I use store-bought whipped topping instead of homemade?
Absolutely. It’s a time-saver and still tastes great, although homemade whipped cream has a fresher flavor.
What’s the best way to slice an ice cream cake?
Dip a sharp knife into hot water before slicing and wipe it clean between cuts.
Can I make it gluten-free?
Yes! Simply use gluten-free cookies for the crumb layer and ensure your other ingredients are certified gluten-free.
Conclusion
This Ice Cream Cake is the kind of dessert that never fails to bring out smiles and “wow” reactions. It’s beautiful, delicious, and surprisingly easy to make at home with just a little bit of prep and planning. Whether you’re celebrating a big event or just treating yourself on a quiet weekend, this cake will make it feel extra special. I hope you’ll give it a try—you won’t be disappointed!
Print
Ice Cream Cake
- Total Time: 13H:10
Description
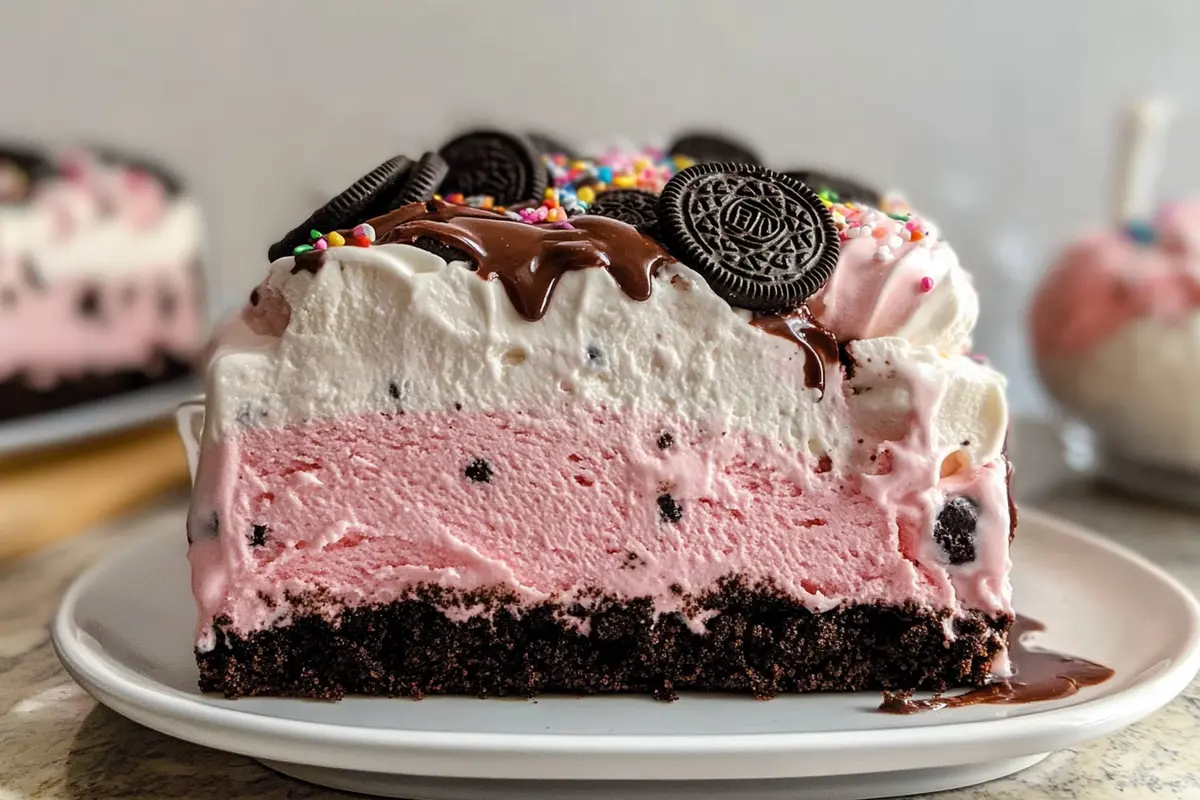
This homemade Ice Cream Cake is a deliciously indulgent dessert featuring layers of creamy chocolate and strawberry ice cream, crunchy Oreo cookie crumbs, rich hot fudge, and a fluffy whipped cream topping. It’s perfect for special occasions like birthdays, holidays, or any time you want a festive treat. Customizable with your favorite ice cream flavors and toppings, this no-bake cake is easy to prepare and can be made ahead of time, saving you stress on the big day. Each bite is a sweet, cold, and crunchy delight that everyone will love!
Ingredients
Cake
-
10 Oreo cookies (110g)
-
2 tablespoons (28g) unsalted butter, melted
-
1 1/2 quarts (1.42L) chocolate ice cream, softened (or other flavor)
-
1 cup (8 ounces/227g) hot fudge sauce, divided (homemade or store-bought)
-
1 1/2 quarts (1.42L) strawberry ice cream, softened (or other flavor)
Topping
-
2 cups (480ml) heavy cream, cold
-
1/3 cup (40g) confectioners’ sugar
-
1 1/2 teaspoons pure vanilla extract
-
Sprinkles, optional for garnish
Instructions
In a food processor or blender, pulse Oreo cookies (including cream filling) into coarse crumbs. Some larger chunks are fine. You should have about 1 cup of crumbs. Mix the crumbs with melted butter and set aside.
Remove chocolate ice cream from the freezer and let soften for 10 minutes. Meanwhile, line a 9×3-inch or 10×3-inch springform pan with plastic wrap, using two pieces for full coverage with overhang. (See Note below for alternative pan options.)
Scoop chocolate ice cream into the lined pan. Working quickly, use the back of a large spoon to spread it into an even layer. Freeze for 30 minutes.
During this time, prepare hot fudge sauce if making homemade, or warm store-bought sauce until spreadable. After 30 minutes, spread 1/2 cup of the hot fudge evenly over the chocolate ice cream layer. Sprinkle the Oreo crumb mixture evenly on top.
Freeze again for 30 minutes. After 20 minutes, remove strawberry ice cream from the freezer to soften for 10 minutes.
Drizzle the remaining 1/2 cup hot fudge over the Oreo layer. Working quickly, spoon and spread strawberry ice cream over the top in an even layer.
Cover the pan with plastic wrap or aluminum foil. Freeze for at least 12 hours and up to 2 days.
If using a cake plate or different serving surface, place it in the freezer for at least 30 minutes before assembling the cake to prevent melting.
Make the whipped cream topping by beating cold heavy cream, confectioners’ sugar, and vanilla extract with a handheld mixer or stand mixer fitted with a whisk attachment on medium-high speed until stiff peaks form, about 4 minutes.
Remove the ice cream cake from the freezer. Remove the springform pan rim. Lift the cake using the plastic wrap and carefully peel off the plastic. Place the cake onto the frozen cake plate or cutting board.
Working quickly, spread whipped cream over the top and sides of the cake. Pipe a decorative border if desired, using a piping bag fitted with a large star tip. Garnish with sprinkles if using.
Slice and serve immediately or return to the freezer for up to 1 hour before serving. Use a very sharp knife dipped in hot water between slices. Keep leftover cake covered in the freezer.
Notes
If you don’t have a springform pan, no worries! You can also use a 9×13-inch baking dish or an 8-inch square pan lined with parchment or plastic wrap. This will make it easier to remove the cake once it’s frozen. Make sure to freeze your tools and cake plate in advance for the best results when assembling and serving the cake!
- Prep Time: 40
- Cook Time: 12H:30